MalwareDetection
During your first installation an initial scan will run with a deep scan included to scout for any possible existing malwares on your server.
This may increase your load temporarily, however, once it is finished, the load should drop back to its normal state.
BitNinja has an excellent module for file-based malware detection. If attackers can break through the defense line of honeypots and the WAF, Malware Detection is the next line to detect file changes, uploads and check them against our database. It is also advantageous to scan your server if you have just started to use BitNinja for the first time, as there could be different malware and backdoor programs on your server. Also, our malware database is ever-growing, so it is recommended to schedule malware scans. Cleaning your files is vital.
We ship new malware signatures automatically so it is always up to date without any manual intervention.
The Database Scanner is an individual module of BitNinja. It does not modify your database in any way, but it logs for any possible injected Malwares. Currently, we do support WordPress and Joomla CMS, but you can learn more here.
File Monitoring System Tool(s)
-
AuditD (package:
auditd)
Monitor the changes of the files to help BitNinja to catch malicious files. Default Monitoring Tool -
Inotify (package:
inotify-tools)
Uses the package to monitor the filesystem for changes.
You need this package to be available before you can use the module.
We ship our own inotify-tools package with BitNinja to ensure the installation.
If you need to install inotify-tools manually for some reason, please follow the steps stated here:
Post-detection, post-quarantine and post-honeypotify scripts.
The difference between Inotify and AuditD is mostly in performance.
While Inotify uses more RAM, its easier on the CPU. AuditD in the otherhand, uses more CPU, but less RAM.
You can check the Active Scan status (file monitoring system) using the following command:
bitninjacli --module=MalwareDetection --list-scans
You can see the visual examples on our knowledgebase article.
You are ready to start the malware detection module now! Before lauching the module please read through the configuration section to prepare the module.
Configuration
You may change the default settings of MalwareDetection on our Dashboard's Configuration -> MalwareDetection OR edit the module config file at /etc/bitninja/MalwareDetection/config.ini.
Don't forget to sync your local configuration to the cloud with bitninjacli --syncconfigs
We always try to set up reasonable defaults for our config files to provide an out-of-the-box experience, but, in this case, there are some configurations you are probably willing to do before starting the module.
Disabling the MalwareDetection module from the dashboard will only disable the real-time malware detection. It will NOT disable the scheduled malware scans. A malware scan be still initiated via cron or via the BitNinja CLI as well.
Example content for the config.ini file:
[Detectors]

[FileSystemMonitor]
monitor_order[]='auditd'
monitor_order[]='inotify'
monitor_order[]='nullMonitor'
monitor_type='auditd'

[analyzer]
analyzer_pull_count=0
automatic_extended_analysis=0

[cache_cleaner]
file_age_threshold_in_days=-10
file_batch_size=1000

[core]
create_signatures_during_phase2=0
cronjob_clean_spool=1
detection_conf_dir='detection.conf.d'
enable_active_scan=1
enable_ai_active_scan=0
enable_ai_scan=0
enable_deep_scan=1
file_path_pull_hard_limit=20
file_path_pull_limit=0
full_scan_paths[]='/home'
full_scan_paths[]='/home*/'
full_scan_paths[]='/tmp'
full_scan_paths[]='/var/spool/cron'
full_scan_paths[]='/var/www'
high_server_load_divider=10
honeypot_file='/opt/bitninja/modules/SenseWebHoneypot/examples/example_honeypot_file.php'
honeypotify=0
last_scanned_row_file='last_scanned_row.info'
load_friendliness=1
load_friendly_timer=20000
maxConcurrentScans=10
max_file_batch=2000
max_unknown_files_hashes=500
memory_limit=800
quarantine=1
quarantine_directory='/var/lib/bitninja/quarantine'
scan_cpunice=19
scan_ionice=6
scan_max_file_size=10485760
scan_min_file_size=32
scan_niceness=0.002
send_api_last_scanned_files_count=20
status_send_api_in_sec=3
upload_malware_source=0
use_defense_robot=1
use_react=1
yara_enable=1

[database]
database_cache=1
filesystem_cache_size_limit=0
filesystem_cache_threshold_behavior='readonly'

[inotify]
exclude[]='/etc/cxs'
exclude[]='/home*/accesslog/*'
exclude[]='/home*/cagefs-skeleton/*'
exclude[]='/home*/cpeasyapache/src/*'
exclude[]='/home*/virtfs/*'
exclude[]='/opt/ai-bolit'
exclude[]='/tmp/*scantem*'
exclude[]='/usr/local/cpanel/base/3rdparty/acronisbackup/*'
exclude[]='/usr/local/directadmin/plugins/acronisbackup/*'
exclude[]='/var/lib/Acronis/mount*'
exclude[]='/var/www/html/app/protected/runtime/*'
exclude[]='/var/www/html/log/*'
exclude[]='/var/www/html/logs/*'
exclude[]='/var/www/vhosts/*/.cagefs'
exclude[]='\.MAD$'
exclude[]='\.MAI$'
exclude[]='\.MYD$'
exclude[]='\.MYI$'
exclude[]='\.log$'
exclude[]='\.sock$'
exclude[]='\.yara$'
exclude[]='^.*_log$'
exclude[]='^.*_log\.processed$'
exclude[]='^.*_ssl_log\.webstat$'
exclude[]='^/home/.*?/mail/'
exclude[]='^/home/accesslog'
exclude[]='^/home/cagefs-skeleton/'
exclude[]='^/home/cpeasyapache/src/'
exclude[]='^/home/virtfs'
exclude[]='^/home\d+/.*?/mail/'
exclude[]='^/home\d+/accesslog'
exclude[]='^/home\d+/cagefs-skeleton/'
exclude[]='^/home\d+/cpeasyapache/src/'
exclude[]='^/home\d+/virtfs/'
exclude[]='^/tmp/clamav-.*'
exclude[]='^/tmp/lshttpd/*\.sock*'
exclude[]='^/tmp/lshttpd/\.rtreport\.*'
exclude[]='^/usr/local/maldetect/quarantine'
exclude[]='^/usr/share/cagefs-skeleton/'
exclude[]='^/var/cache/awstats'
exclude[]='^/var/cache/buagent/md0.cache.data$'
exclude[]='^/var/lib/bitninja'
exclude[]='^/var/lib/mysql'
exclude[]='^/var/log/bitninja'
exclude[]='^/var/tmp/clamav-.*'
file_path[]='/home*/'
file_path[]='/tmp'
file_path[]='/var/spool/cron'
file_path[]='/var/www'
log_dir='/var/log/bitninja/inotify'
log_file='inotify.log'
log_max_size=104857600

[module]
depends[]='AuditManager'
depends[]='SenseLog'
includes[]='lib/DTO'
includes[]='lib/abstract'
includes[]='lib/collectors'
includes[]='lib/detectors'
includes[]='lib/filters'
includes[]='lib/interfaces'
includes[]='lib/struct_analysis'
includes[]='lib/struct_analysis/sqlite'
ipc_num=516
message_polling_time=2
message_pull_limit=20
nice_level=18

[quick_cache]
l1_chunk_size=400
l1_chunks=30
l1_to_l2_threshold=3

[whitelist]
extensions[]='MAD'
extensions[]='MAI'
extensions[]='MYD'
extensions[]='MYI'
extensions[]='sock'
extensions[]='yara'
paths[]='/bin'
paths[]='/dev'
paths[]='/etc/cxs'
paths[]='/home*/accesslog/*'
paths[]='/home*/cagefs-skeleton/*'
paths[]='/home*/cpeasyapache/src/*'
paths[]='/home*/virtfs/*'
paths[]='/home/accesslog'
paths[]='/home/cagefs-skeleton'
paths[]='/home/cpeasyapache/src'
paths[]='/home/virtfs'
paths[]='/lib'
paths[]='/lib32'
paths[]='/opt/ai-bolit'
paths[]='/opt/bitninja'
paths[]='/proc'
paths[]='/sbin'
paths[]='/sys'
paths[]='/tmp/*scantem*'
paths[]='/usr'
paths[]='/usr/**/!(www)'
paths[]='/usr/local/cpanel/base/3rdparty/acronisbackup/'
paths[]='/usr/local/directadmin/plugins/acronisbackup/'
paths[]='/var/cache/awstats'
paths[]='/var/lib/Acronis/mount'
paths[]='/var/lib/bitninja'
paths[]='/var/lib/mysql'
paths[]='/var/log/bitninja'
paths[]='/var/www/html/app/protected/runtime/'
paths[]='/var/www/html/logs/'
paths[]='/var/www/vhosts/*/.cagefs'
Quarantine behaviour
The quarantine behaviour depends on a setting in the module's config.ini file.
If the 'quarantine' option is enabled, BitNinja moves the infected file to quarantine.
You can find the quarantine directory at
/var/lib/bitninja/quarantine so you can restore any files if you need.
This module is also integrated with another BitNinja module, the
Web Honeypot module. When a botnet attacks your system it will try to infect
your files. If you only quarantine the file, the botnet will try to upload
other malware and other variations of the infection and will eventually
succeed and infect your system.
If the honeypotify config option is
enabled, the module will automatically copy a honeypot file in place
of the original malware. This way when the botnet comes back to check the
operation of the malware infection, the honeypot will collect the IP address
of the attacking bot and add it to the challenge list, immediately protecting
all your servers against this attacker.
Example quarantine directory structure:
    ├── var
    │   ├── lib
    │   │   ├── quarantine
    │   │   │    ├── 2016
    │   │   │    │    ├── 12
    │   │   │    │    │    ├── 10
    │   │   │    │    │    ├── 17
    │   │   │    ├── 2017
    │   │   │    │    ├── 01
    │   │   │    │    ├── 02
    │   │   │    │    │    ├── 01
    │   │   │    │    │    ├── 05
    │   │   │    │    │    ├── 10
    │   │   │    │    │    ├── 17
    │   │   │    │    ├── 03
    │   │   │    │    │    ├── 12
    │   │   │    │    │    ├── 13
Some examples for quarantinized malware information:
7650_jquery94.php, 7650_jquery94.php.info
Where the file with the .info extension contains information about the malicious file
(original owner, group, file permissions, file path, malware name, file size,
create time), while the other is the malicious file itself. Both files are prefixed
with a unique identifier.
MalwareDetection worker caps
In the module's config file you can change the maximum number of MalwareDetection workers.
If the corresponding variable is not present in the /etc/bitninja/MalwareDetection/config.ini file then add it manually under the [core] section in the config file.
Example:
[core] ; If file_path_pull_limit is set to 20 then max number of workers is 80 file_path_pull_limit = 20
The maximum total number of MalwareDetection workers will be four times the 'file_path_pull_limit' variable's vaule.
If the file_path_pull_limit is raised it is highly recommended to also increase the memory limit of the module, because of the increased number of files processed simultaneously.
The memory_limit variable can be modified in the config file under the [core] section.
The file_path_pull_limit variable's default value is set to 0, which means the maximum number of files processed by the SA and YARA workers each will be the double of the number of CPU cores in the server. The upper limit of the simultaneously processed files by each worker pool is 40. So with the default settings, the total number of MalwareDetection workers is limited to 80, (40 SA and 40 YARA workers) in case of any number of available CPU threads.
Throttle file processing
In the Malware Detection module's config file you can throttle the file processing to decrease the scans' impact on the server's load if it causes issues.
Example:
; The higher this value is, the fewer resources scans will consume (while also being slower). ; Ranges from 0 to 1 ;scan_niceness = 0.002
The scan niceness is on a 0-1 scale. The closer it is to 1 the less effect it has on the server's load, also making the scans slower.
The default value for the scan_niceness variable is 0.002.
If this variable is not present in your BitNinja agent's config file, then make sure that the version of the agent is 2.38.4 or newer, and then add the lines above manually to the config file.
Filesystem cache settings
The Malware detection module creates a Filesystem cache, to speed up the malware scan process while lowering the consumed server resources.
From the MalwareDetection module's config file the Filesystem cache can be limited and the behavior of the cache can be also changed.
The corresponding variables can be found under the [database] flag in the /etc/bitninja/MalwareDetection/config.ini file.
By default, the Filesystem cache's size is not limited. However, using the filesystem_cache_size_limit variable the limit can be set in megabytes.
By setting the filesystem_cache_threshold_behavior variable to a value you can define what happens when the Filesystem cache reaches the limit.
By default, the filesystem_cache_threshold_behavior is set to readonly which means that the Filesystem cache won't be updated.
With the delete option, the Filesystem cache will be deleted when it reaches the limit.
The filesystem_cache_threshold_behavior variable only takes effect, if there is a size limit set for the Filesystem cache.
; The maximum size of the filesystem cache, in megabytes. Default: 0, which means the cache size is not limited.
;filesystem_cache_size_limit = 0
; What to do if the size of the filesystem cache exceeds the limit. Possible values: 'readonly', 'delete'
;filesystem_cache_threshold_behavior = 'readonly'
Disabling the quarantine functionality
If you'd like to disable the quarantine behavior of the Malware Detection module, you may disable the Quarantine toggle on our dashboard.
Additionally you may to change a setting in the module's config.ini file:
- Locate the config file at
/etc/bitninja/MalwareDetection/config.ini - Look for the Core settings section
- Replace the
quarantine=1withquarantine=0 - Do not forget to sync the changes with
bitninjacli --syncconfigs
The example config.ini file's core section should look something like this:
[core]
create_signatures_during_phase2=0
cronjob_clean_spool=1
detection_conf_dir='detection.conf.d'
enable_active_scan=1
enable_ai_active_scan=0
enable_ai_scan=0
enable_deep_scan=1
file_path_pull_hard_limit=20
file_path_pull_limit=0
full_scan_paths[]='/home'
full_scan_paths[]='/home*/'
full_scan_paths[]='/tmp'
full_scan_paths[]='/var/spool/cron'
full_scan_paths[]='/var/www'
high_server_load_divider=10
honeypot_file='/opt/bitninja/modules/SenseWebHoneypot/examples/example_honeypot_file.php'
honeypotify=0
last_scanned_row_file='last_scanned_row.info'
load_friendliness=1
load_friendly_timer=20000
maxConcurrentScans=10
max_file_batch=2000
max_unknown_files_hashes=500
memory_limit=800
quarantine=0
quarantine_directory='/var/lib/bitninja/quarantine'
Whenever you'd like to enable the quarantine function again, you should simply change the quarantine setting to 1.
If you edit the content of the /etc/bitninja/MalwareDetection/config.ini file, you have to reload the Malware Detection config for the changes to take effect.
You can do this by using the following command:
bitninjacli --module=MalwareDetection --reload
Don't forget to sync your local configuration to the cloud with bitninjacli --syncconfigs
Scan path
The most important config change you will probably do is defining what
directories the module should monitor for file changes. The defaults are
the /tmp, /home and /var/www directories, but you can add any other directories by defining new paths. For example:
file_path[] = '/var'
Exclude patterns
You can define patterns to be excluded from being scanned. This is useful to exclude files like log files.
exclude[] = '/var/www'
Don't forget to reload the configuration of Malware Detection after altering it for the settings to take effect.
Module initialization
When the Malware Detection module starts at the first time (or any time the
inotifywait process stops or is killed) the system have to reinitialize the
inotify process. This is a very CPU and disc intensive process and can take
hours to finish. (It should traverse all directories and set a flag on them
to be monitored. Sorry, this is how the Linux kernel handles the inotify functionality.)
You can find the module logs at /var/log/bitninja/mod.malware_detection.log.
We'd like to help you by sharing our own experiences regarding the module's resource usage. We have 30+ production servers at our shared hosting company right now. In one of the bigger ones, the number of files is 11 714 930. In this case the initial step takes about 5 hours and it doesn't cause any load issues after that. The average load on this server is 3.
Manual scanning
BitNinja is continuously listening for file changes, but you are also able to run
manual scanning with the CLI tool. E.g. in order to look after malware in the
/var/www folder, use this command:
bitninjacli --module=MalwareScanner --scan=/var/www
If you'd like to cancel all malware scan that's already been started, you can do it using the following command:
bitninjacli --module=MalwareScanner --cancel
Manual scanning works fine without installing inotify-tools.
Scheduled Scan
This is a useful feauture to ensure that your servers are clean, depending on the size of your server, you might want to adjust how often you wish to run a new scan.
You modify your scheduled scan per server on this page from the Dashboard.
Don't forget to adjust your timezone settings in the Account Settings.
Restoring files from quarantine
You can manually restore files from the quarantine using the following command:
bitninjacli --restore=/path/to/file
Post-detection, post-quarantine and post-honeypotify scripts
You can implement your own business logic to run after each detected malware.
You should write your own scripts in an .sh file and place it in the /etc/bitninja/MalwareDetection/detection.conf.d
folder.
For post-detection scripts, name your file using the pd\_ prefix, like this: pd_my_script.sh.
These scripts will run immediately after the module detects an infected file.
For post-quarantine scripts, the prefix should be pq\_, like this: pq_my_script.sh.
These scripts will be executed after the module moves the malware file to quarantine.
For post-honeypotify scripts, the prefix should be ph\_, like this: ph_my_script.sh.
Scripts that start with ph\_ will run after the module replaces the infected file with a honeypot file.
Note For the post-quarantine scripts to run, the quarantine function must be enabled in the module's config.ini file.
For the post-honeypotify scripts to work, the honeypotify function must be enabled in /etc/bitninja/MalwareDetection/config.ini.
Example for a post-detection script: pd_example.sh
#!/bin/bash
This post detection script just echoes out the path to the detected malware
echo "Malware found at path [$1] Malware name is [$2]" > /path_you_wish_to_save_outcome/malware.txt
Optional: manual installation of inotify-tools
Installing inotify-tools on .DEB based systems
apt-get update && apt-get install inotify-tools
Installing inotify-tools on .RPM based systems
yum --enablerepo=epel install inotify-tools
On some systems the inotify-tools package is not available by default, so you have to enable the EPEL repository.
Package inotify-tools has to be on the latest version (v3.14).
This will install the inotify-tools package on your server so the module can
use it.
AI Malware Scan
With this feature, the BitNinja agent can scan files for malware at a faster pace without adding to the server load. The remote scan function transfers only specific metadata and the MD5 hash of the scanned files, without downloading the files themselves from the server. This results in the usage of only about 16 bytes per file, making the bandwidth usage of this feature almost negligible.
For users registered before 2023.12, the AI scanner is disabled by default, and enabled for any user who registered their accounts after this date. You can enable the feature by changing the MalwareDetection module's configuration on the Dashboard.

Through config.ini
Path:
/etc/bitninja/MalwareDetection/config.ini
Set enable_ai_scan to 1 to enable it.
If you decide to adjust the configuration /etc/bitninja/MalwareDetection/config.ini through CLI, don't forget to sync your local configuration to the cloud with bitninjacli --syncconfigs
AI Active Scan

Offload the malware scanner's file system monitoring to the cloud instead of your own server, reducing load and using advanced AI features to find malicious files. The file monitoring package such inotify OR auditd is still neccessary to recognize the file changes.
The feature by default is disabled. You can enable the feature by changing the MalwareDetection module's configuration on the Dashboard.
Through config.ini
Path:
/etc/bitninja/MalwareDetection/config.ini
Set enable_active_scan to 1 to enable it.
If you decide to adjust the configuration /etc/bitninja/MalwareDetection/config.ini through CLI, don't forget to sync your local configuration to the cloud with bitninjacli --syncconfigs
Offload malware scan to a backup server & enable Cleaning MD5 signatures
Prerequirements
- You can find the necessary repository on the following Link
- You need to have uncompressed backups from the files on your production web servers
- You need to have bitninja installed on your production web servers
- You need to have bitninja installed on your backup server with the same user as the production web servers
Limitations
This proof of concept setup assumes that you only log malware catches on your production web servers. Cleaning of injected files is not supported yet by this proof of
concept script. Caution! If you have enabled quarantining on the production web servers and use this setup, injected files will be quarantined instead of cleaned.
This is an important limitation. Please use the PoC on your own risk. Once the proof of concept proves to be successful we will reimplement this feature in the agent.
Please contact BitNinja support after 2023 Q1 if this feature had been implemented in the agent as a production ready feature.
Only the scheduled / manual scans will be offloaded with this PoC. The realtime scans (if they are enabled) will still do the whole scan on altered or newly created files.
Installation
Follow the steps on how to offload the malware scanner load onto the backup machine. (And enable Cleaning MD5 signature)
What is this repository for?
- This repository enables you to offload the malware scan to a backup server. This will reduce load generated by BitNinja's Malware Detection on your production machines.
- The
pd_createmd5.shscript will automatically pick up new infections on the backup machine(s),
then it will create and publish a new user-level md5 signature that will quarantine the file on the production machine(s) because
bitninja can automatically distribute user created signatures across all of your servers.
How do I get set up?
- Disable the Phase 2 scan on the production machine(s)
Open the /opt/bitninja/modules/MalwareDetection/config.ini file with your favourite text editor, and edit the value of enable_deep_scan to 0
- Disable the active scan on the backup machine(s)
Log in to your dashboard and turn the MalwareDetection module off on the backup machine(s).
This will allow manual / scheduled scans to run, but active scan will be disabled.
- Deploy pd_createmd5.sh on the backup machine(s)
Copy the pd_createmd5.sh to the following directory on the backup machine(s):
/etc/bitninja/MalwareDetection/detection.conf.d
cp /path/to/repository/pd_createmd5.sh /etc/bitninja/MalwareDetection/detection.conf.d
- Set up a scheduled scan on the production machine(s)
Log in to your dashboard and navigate to the Anti-Malware > Scan settings page and schedule a malware scan for every production machine.
- Additional steps to use MD5 Cleaning signatures to further improve efficiency.
This setting allows your agent to create a new type of signature capable of cleaning files during the first phase of scan. (Without this setting only quarantining is available.)
Change the following flag in /etc/bitninja/MalwareDetection/config.ini from create_signatures_during_phase2 = 0 to create_signatures_during_phase2 = 1. (If you do not have this setting in your /etc configuration file, then please locate the [core] section and add it directly under it.)
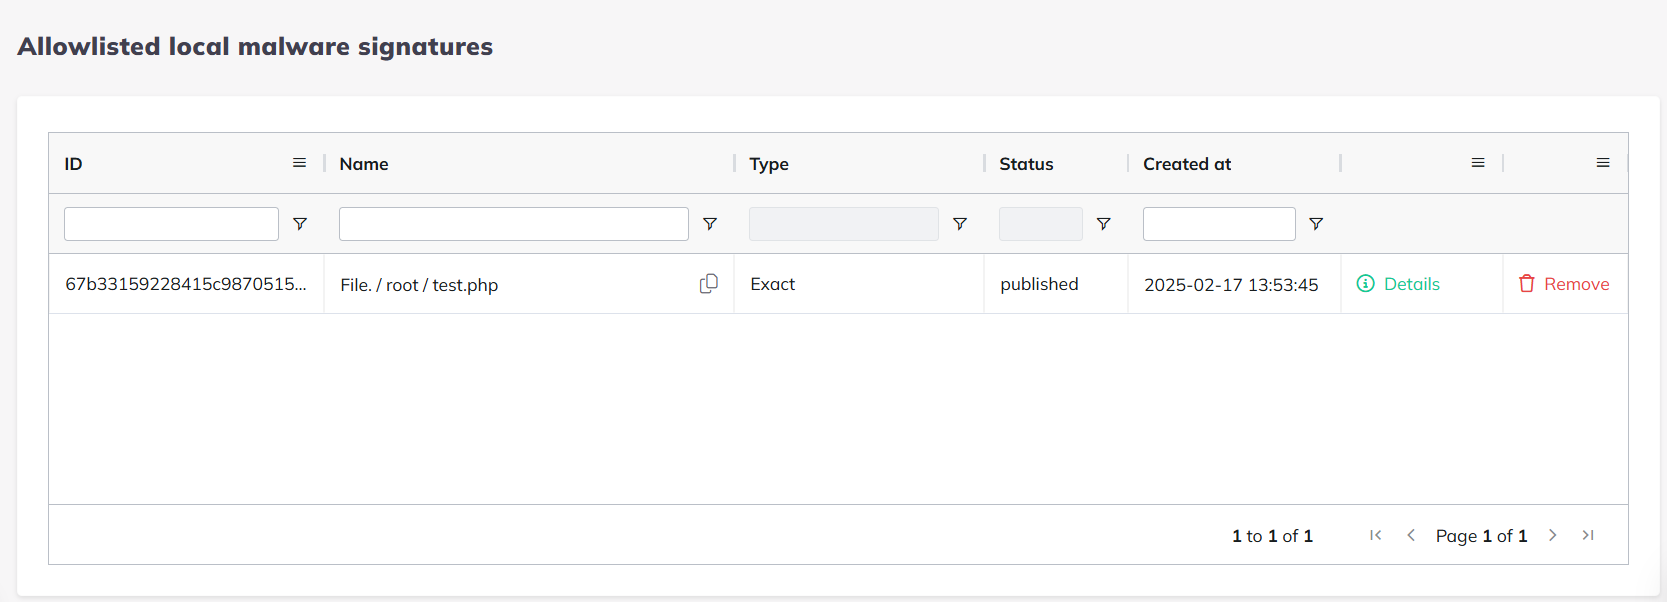
Local Malware Signatures
Allowlisted local malware signatures
This page gives you an overview of what exact signatures and/or files are allowlisted on your servers.
The list will provide the signature ID, the name (path) of the file, the type of catch (exact or snippet), the status of the signature, the creation time and date of the allowlisted signature, details to see the source code and the remove command.
A whitelisted user "signature" may be automatically removed, causing it to disappear randomly for the user. This can happen if:
- A file is detected with a certain blacklisted signature.
- The user restores the file, placing it on the whitelist.
- Later, the blacklisted signature is discarded or deleted.
Actions
You can add/remove to the allowlisted local malware signatures two ways right now:
-
From the Overview page and Malware Information -> Infected Files section you may restore (false positive) files which will not only restore all files to the its original location which matches the signature but also add this signature ID to the allowlisted local malware signatures.
-
Over CLI you may use the following command to add/remove a signature/file to the allowlisted local malwares:
-
Add
bitninjacli --module=MalwareDetection --whitelist-file=/root/test.php
-
Removal
bitninjacli --module=MalwareDetection --remove-whitelist --id=67b33159228415c9870515e8
-
This will send the request to our API to add or remove the signature on allowlist to your account and apply it on all servers.
This should be also visible within the /var/log/bitninja/mod.malware_detection.log the following way:
[info] +00:00 2025-02-18 14:55:29 - |MalwareDetection| Received command [\BitNinja\MalwareDetection\WhitelistFileCommand].
[info] +00:00 2025-02-18 14:55:29 - |MalwareDetection| New file recieved for whitelisting. [/root/test.php]
[info] +00:00 2025-02-18 14:55:29 - |MalwareDetection| Adding file [/root/test.php] to the whitelist on the [agent] channel
[info] +00:00 2025-02-18 14:55:30 - |MalwareDetection| Received command [\BitNinja\MalwareDetection\AddSignatureToLocalWhitelistCommand].
[info] +00:00 2025-02-18 14:55:30 - |MalwareDetection| Downloaded 1 [user] [md5] [whitelist] signatures.
Blacklisted local malware signatures
This page gives you an overview of what exact signatures and/or files are blocklisted on your servers.
Additionally compared to the whitelisted page, you are able to upload "unknown" and/or "new" PHP malware files. This way you can teach BitNinja and catch these signatures on your servers, especially if they attack more of your servers.
Actions
Adding New Malware
Adding a new malware is fairly simple. Click on the red "+ Add New Malware" button which will give you a popup window to upload that specific file and name the malware.
In case the malware is already known or discarded (because it causes too many false positives) you will receive an error notification in the top right corrner.
Validating
Our Threat Management team and direct services handle the validation of new malwares, so you normally just have to sit back, but in case you noticed a malware that is new and impacted any of your customer or your websites, you can upload these and decide their faith. This can be achieved on the Validating page
Last, if you notice any "Validating" malwares on the Anti-Malware overview page, its typically meaning that the signature is being reviewed by our staff.